OIML BULLETIN - 2025 - VOLUME LXVI - NUMBER 4
e v o l u t i o n
Metrological validation of the procedure used for industrial filling of gas cylinders
Alessandro Ferrero 1, Andrea Fieschi 2,
1, Monica Soana 2
1. Politechnico di Milano , Milan, Italy
2. Federchimica Assogastecnici, Milan, Italy
3. Coordinator of the Assogastecnici Working Group on Legal Metrology
Citation: A. Ferrero et al. 2025 OIML Bulletin LXVI(4) 20250404
Abstract
Industrial gases, such as oxygen (O2), nitrogen (N2) and argon (Ar), are generally exchanged in cylinders, of volume between 5 L and 50 L, while economic transactions are based on the mass of the gas contained within the cylinders under given filling conditions. The most immediate and, hence, accurate way to quantify the mass of gas contained in a cylinder is the gravimetric method, which requires weighing the cylinder before and after the filling process on a Non-Automatic Weighing Instrument (NAWI), so that the gas mass is obtained as the difference between the two measured values. This method is, however, time and resource consuming and, as such, not sustainable when applied at industrial level. An alternative, time- and resource-effective method is the pressure-based method, where the amount of gas is quantified using the well-known gas law, knowing the volume of the cylinder and measuring gas pressure and temperature during the filling process. In this paper we present a metrological analysis of the pressure-based method, and show its metrological compatibility with the gravimetric method. The analysis has been validated through experiments conducted at industrial gas filling facilities.
1. Introduction
Industrial gases represent a significant market, globally estimated at 100 billion USD and rapidly growing, due to increasing demand in several sectors, such as manufacturing, metallurgy, chemicals, electronics, and healthcare. It is estimated that 1.74 billion tons of gas were produced and sold in 2025 worldwide, with oxygen leading the global market with a 32% share and delivery by cylinders representing
These figures indicate the critical importance of a fast and efficient filling procedure in the whole production and delivery process of industrial gases. A widely employed filling method for compressed gases – probably the most widely used – is the so-called pressure-based method, which is suitable for filling cylinders with both single gases and mixtures of gases. Although various standards regulate the filling process and the requirements for the cylinders [2, 3, 4, 5], no specific standards or laws regulate the way in which the quantity of gas in the cylinders at the end of the filling process is measured. This leaves scope for different interpretations as to which measurement method should be used to assess the quantity of gas exchanged in a commercial transaction, which could become particularly critical if the measurement activity falls in the legal metrology domain.
The trade of compressed industrial gases is usually based on the mass of the exchanged gas, not its volume, even though it is stored in cylinders of a fixed size. The most direct way of measuring the amount of the gas contained in a cylinder is the gravimetric method, whereby the cylinder is weighed before and after being filled, and the net mass of gas is obtained as the difference between the two measured values.
However, although accurate, this method is not sustainable at the industrial level, because it is time, resource and energy consuming. It must be applied to every individual cylinder, whereas the filling process is typically an automated process applied to batches of several cylinders – usually 16. Moreover, the filling process estimates the amount of gas delivered to the cylinders by means of the well-known thermodynamic gas law, without any additional operation on the cylinders.
While this method has been accepted for decades as best industrial practice, it lacks a strict metrological characterization aimed at evaluating all uncertainty contributions and an assessment as to whether it is metrologically compatible with the gravimetric method and meets the agreed maximum permissible error, or tolerance, requirements.
In this paper we present a metrological analysis of this pressure-based method to derive the mass of the gas filled into the cylinders from the gas law, identifying all significant contributions to uncertainty, and providing directions on how to evaluate them. We then report the results of experiments conducted at an industrial gas filling facility, utilizing a station that is regularly used for standard filling operations. A comparison of the mass values obtained with those obtained by gravimetric measurements, shows that the commonly employed method is metrologically compatible with the gravimetric one, and is adequate for the intended application.
2. Pressure-based filling method
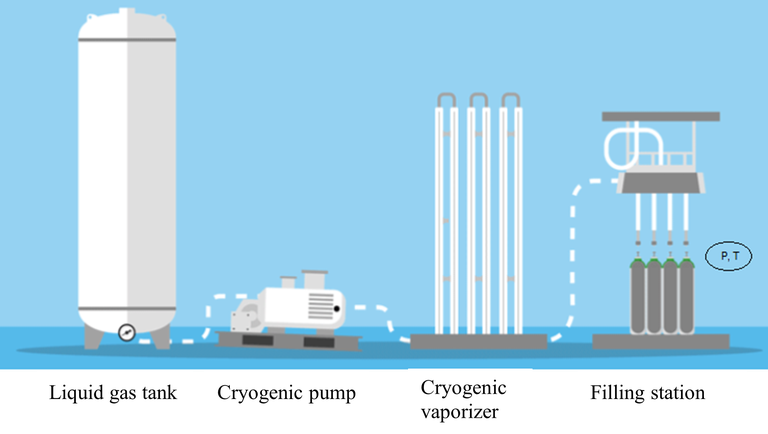
At industrial filling facilities, gas cylinders are filled following the sequence of operations shown schematically in Figure 1.

Figure 1. Sequence of filling operations
The gas is stored in liquid phase at cryogenic temperature and is transferred, by means of a cryogenic pump, to a heat exchanger (the cryogenic vaporizer), where the liquid-gas phase transformation occurs. The gas is then sent to the filling station, where it is filled into the cylinders until the filling pressure reaches the preset condition.
When gas mixtures are considered, each gas is sequentially sent to the filling station and is filled into the cylinders until the filling pressure reaches the preset partial pressure. Since the measurement process can be considered, in principle, as the same for single-gas and gas-mixture filling operations, which differ only for the preset conditions, the simplest case of single-gas filling operations is considered here, without loss of generality.
The thermodynamics of the filling process follows the well-known gas law:
where:
- P is the gas absolute pressure;
- vm is the gas molar volume;
- Z is the gas compressibility factor at the given pressure and temperature and can be obtained from the NIST Standard Reference Database 23 - “NIST Reference Fluid Thermodynamic and Transport Properties” [6];
- R is the universal gas constant;
- T is the gas absolute temperature.
Considering the gas density r under the above conditions, the molar mass M = ρ vm is obtained. Similarly, given the volume Vc of the cylinder, the mass of gas filled into the cylinder, under the above filling conditions is given by:
Inserting the molar volume given by (1) into (2), the mass of the gas filled into the cylinder is obtained:
Equation (3) shows that the mass of the gas filled into the cylinder can be obtained from the cylinder volume Vc and measuring the absolute pressure P and the absolute temperature T of the gas at the end of the filling process.
While in theory (3) provides the exact mass value, it does not take into account the different contributions to uncertainty that affect the measured quantities and, consequently, the quantities – such as the compressibility factor Z – that depend on the measured quantities.
3. Uncertainty budget
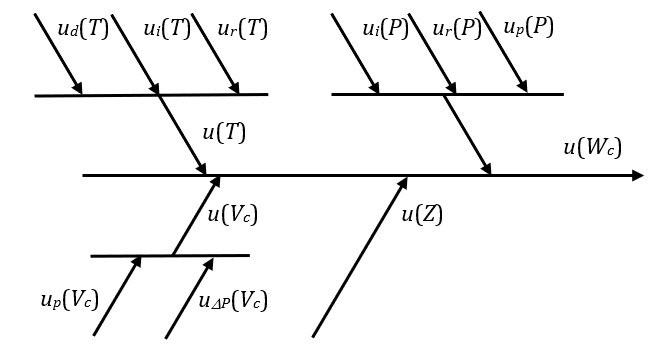
The different contributions to uncertainty are considered in the uncertainty budget shown in Figure 2.

Figure 2. Uncertainty budget for the gas mass provided by (3).
The following components can be identified.
- u(T) is the standard uncertainty associated with the measured value of gas temperature. It is obtained by combining three components:
- ud(T) is the definitional uncertainty contribution: it considers that the actual measured temperature is that of the external surface of the cylinder, and, hence, it takes into account the uncertainty in the evaluation of the internal gas temperature from the measured external surface temperature;
- ui(T) is the instrumental uncertainty obtained from the calibration certificate, issued by an accredited calibration lab, of the thermometer (or temperature sensor) employed to measure the temperature of the cylinder external surface;
- ur(T) is the uncertainty contribution associated with the thermometer resolution.
- u(P) is the standard uncertainty associated with the pressure measurement. It is obtained by combining three components:
- ui(P) is the instrumental uncertainty obtained from the calibration certificate, issued by an accredited calibration lab, of the instrument employed to measure the gas pressure inside the cylinder;
- ur(P) is the uncertainty contribution associated with the instrument resolution;
- up(P) is the uncertainty contribution associated with the possible parallax errors that may occur when reading analog pressure gauges.
- u(Vc) is the standard uncertainty associated with the value assigned to the cylinder volume. It is obtained by combining two components:
- up(Vc) is the uncertainty contribution due to the variability in the cylinder production process that results in a dispersion of volume values about the rated value;
- uΔP(Vc) is the uncertainty contribution associated with the estimated volume increment due to the pressure increase during the filling process.
- u(Z) is the standard uncertainty value associated with the compressibility factor Z of the considered gas under the pressure and temperature conditions at the end of the filling process. Even though the values provided by NIST [6] have negligible uncertainty, the pressure and temperature values for which they are obtained are affected by the uncertainty contributions identified above. Therefore, the Z values obtained are also distributed over an interval related to the possible variations of the pressure and temperature values. The u(Z) uncertainty contribution is evaluated according to this interval.
These uncertainty contributions can be combined, according to the uncertainty propagation law [7], to obtain the combined standard uncertainty u(Wc) associated with the Wc value given by (3). Considering that Z depends directly on the measured values of P and T, and hence a full direct correlation must be considered between Z and P and between Z and T, the combined standard uncertainty is given by:
where, according to (3):
4. Evaluation of the uncertainty contributions
In order to assess whether the measurement method is adequate for the intended use, including when the measurement application falls within the legal metrology domain, the uncertainty contributions identified in the previous section must be evaluated. To this purpose, Assogastecnici [a] shared the knowledge of its member companies about the filling process and the employed equipment and promoted controlled filling experiments on the filling facilities of its member companies, thus obtaining the results reported in the following sections.
4.1 Evaluation of u(Vc)
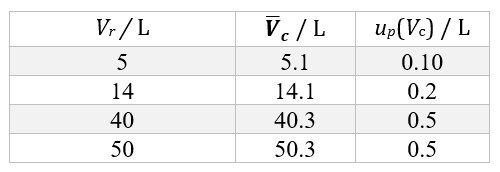
Each cylinder undergoes periodic verifications imposed by law, and therefore there exists a database of thousands (and sometimes tens of thousands) of values of cylinder volume. For the most commonly used cylinder sizes, we can thus determine the mean volume and the standard deviation of the distribution of the values. The obtained standard deviation is the up(Vc) standard uncertainty contribution associated with the dispersion of volume values. Table 1 shows the values obtained for cylinders of volume 5 L, 14 L, 40 L, and 50 L.
Table 1. Mean volume values (Vc) and standard uncertainty contributions (up(Vc)) associated with the dispersion of volume values, for cylinders of rated volume Vr.

The data shown in Table 1 refer to the cylinder volume at atmospheric pressure. During the filling process, the volume increases slightly due to the increased pressure. This variation, and the associated standard uncertainty contribution uΔP(Vc), have been evaluated theoretically for the expected pressure [b] at the end of the filling process, starting from the cylinder design data, and the obtained values have been experimentally validated by immersing the cylinders in water before and after filling. Table 2 reports the correction factors for the average volumes and the associated standard uncertainty contributions, for the same rated volumes as considered in Table 1.
Table 2.. Correction factors (ΔVc) and associated standard uncertainty contributions (uΔP(Vc)) for the cylinder volumes due to the increment of the internal pressure, for cylinders of rated volume Vr.

The volume to be considered in (3) is therefore given by:
and the associated uncertainty is given by:
4.2 Evaluation of u(T)
According to the considerations reported in Section 3, three components contribute to the evaluation of the standard uncertainty associated with the measured gas temperature. The component that is most difficult to evaluate is ud(T), associated with the difference ΔTg,s between the desired gas temperature and the measured temperature of the cylinder external surface. The theoretical determination of such a difference involves a number of parameters, related to the heat-transfer equation, that are almost impossible to estimate. This difference was therefore determined experimentally by letting the cylinders cool down in controlled environments. The process involved monitoring the thermal transient of pressure and temperature until the gas, the cylinder wall, and the environment reached a state of thermal equilibrium. By applying the gas law, it is possible to extrapolate the gas temperature at the beginning of the cooling process, which corresponds to the end of the filling process.
The experiments repeated under different conditions showed an average temperature difference of +1 °C of the gas over the external cylinder surface, with a standard deviation of 0.29 °C. Consequently, the gas temperature is obtained by applying a +1 °C correction to the measured temperature of the cylinder external surface and it is assumed that the corresponding uncertainty contribution is ud(T) = 0.29 °C.
The calibration certificate of the temperature sensor employed provided a calibration standard uncertainty ui(T) = 0.15 °C. The instrument resolution is 1 °C and therefore, assuming a uniform distribution over interval ±0.5 °C, the component of standard uncertainty associated with the sensor resolution is given by ur(T) = 0.29 °C.
The standard uncertainty associated with the temperature measurement is therefore given by:
which for the experiments performed yields u(T) = 0.43 °C.
4.3 Evaluation of u(P)
According to the considerations reported in Section 3, two components contribute to the evaluation of the standard uncertainty associated with the measured gas pressure, independently of the type of employed instrument, while a third component shall be additionally considered when the employed instrument is an analogue gauge.
The first component, ui(P), is obtained from the calibration certificate and, for the instrument employed in the reported validation experiment, it is: ui(P) = 130 kPa = 1.3 bar [c].
The second component (ur(P)) is the uncertainty contribution associated with the instrument resolution. In the validation experiment, a digital instrument was employed, with a 1 bar resolution, corresponding to the value assigned to the least significant digit. Therefore, assuming a uniform distribution of the resolution error in a ±0.5 bar interval, the standard uncertainty contribution associated with the instrument resolution is given by ur(P) = 0.29 bar.
If an analogue gauge is used, a third contribution (up(P)) associated to a possible parallax error shall be considered. To evaluate this contribution, at the end of the filling process, the gauge is repeatedly read by several operators so that no less than 10 readings are obtained. The standard deviation of such readings is then assigned to up(P).
The resulting standard uncertainty, for the pressure measurement, is hence given by:
In the considered validation experiment, a digital instrument was used so there was no parallax error
4.4 Evaluation of u(Z)
As stated in the previous section 3, the compressibility factor Z is obtained from the NIST database [6], starting from the measured values of T and P, for which the standard uncertainties are respectively u(T) and u(P). From these values, we can estimate the possible interval of variation for T and P, and, hence, the possible interval of variation for Z. Assuming a value z for such an interval, and assuming that the values that can be assigned to Z are uniformly distributed over this interval, the standard uncertainty associated with Z is given by:
5. Results of the validation experiment
Having evaluated all components of uncertainty, it is possible to apply (4) and obtain the standard uncertainty u(Wc) associated with the obtained value Wc for the mass of gas filled into the cylinders.
The filling procedure was repeated several times, with different gases (O2, N2 and Ar) on batches of 16 cylinders. Pressure and temperature were measured at the end of the filling process and again after the cylinders cooled down to ambient temperature, so that gas, cylinder wall and environment could be considered in a state of thermal equilibrium. In such a way, the assumption made on the temperature difference between the internal gas and the cylinder external surface could be verified.
Each cylinder was weighed on a calibrated NAWI before being filled, and was weighed again, on the same NAWI, after being filled. The mass of the gas filled into each cylinder was then estimated by computing the difference between the two measured weights. The repeatability urep(W) of the employed NAWI was experimentally evaluated as the standard deviation of 20 measurements of the same cylinder. Since the same NAWI was used to weigh the cylinders before and after being filled, and was thus employed as a mass comparator, the only contributions to uncertainty were the repeatability and resolution (ur(W)). Therefore, the standard uncertainty associated with the gravimetric measurement of the gas mass is given by:

In the considered validation experiment we obtained u(W) = 3.3 g.
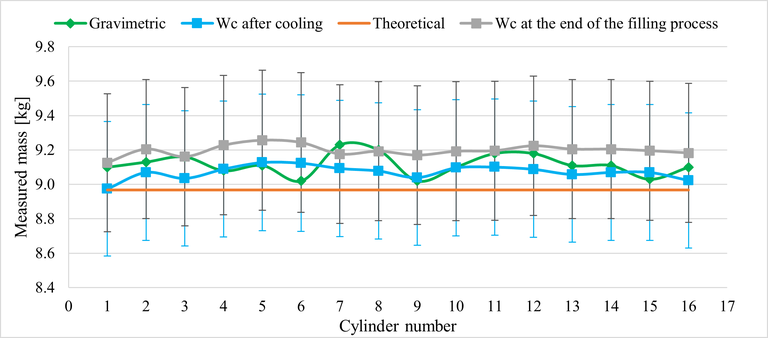
Figure 3 shows the measured values of the mass of N2 gas filled into a batch of 16 cylinders with rated volume of 40 L at one of the filling facilities.

Figure 3. Values of the mass of N2 gas filled into each of 16 cylinders, measured by means of the gravimetric method (green line), applying (3) at the end of the filling process (grey line) and after the cylinders have cooled down to ambient temperature (blue line). The orange line shows the values obtained from (3) under the reference conditions of 200 bar and 15 °C and considering the rated volume of 40 L for all cylinders, since this value is generally used in the transactions. The vertical bars represent the intervals defined by the expanded uncertainty (k = 2) about the measured values.
The green line shows the values of mass measured by means of the gravimetric method. This method being the most accurate one, these values are considered as reference values. The difference of measured values between the cylinders in the batch is due to the differences in the actual volume of the cylinders and the unavoidable slight differences in the temperature and pressure of each cylinder that result in different quantities of gas filled into them.
The grey and blue lines show the mass values obtained by applying (3) to the measured pressure and temperature at the end of the filling process (grey line) and after the cylinders cooled down to ambient temperature (blue line). The vertical error bars represent the intervals, about the measured values, of amplitude ±U(Wc), where U(Wc) = 2 u(Wc) is the expanded uncertainty obtained by multiplying the standard uncertainty given by (4) by a coverage factor k = 2.
It is seen that the values provided by (3) at the end of the filling process (grey) and after the cooling time (blue) are metrologically compatible with each other and with the values obtained from the gravimetric method (green). Moreover, the estimated expanded uncertainty was always less than 5 % of the measured value, so the employed measurement method is adequate to ensure that the quantity of gas filled into the cylinders is compliant with the 10 % tolerance that is generally agreed upon by the parties in gas trading.
The orange line in Figure 3 shows the theoretical values obtained by (3) under the reference conditions of 200 bar and 15 °C for a rated volume of 40 L. These values are also compatible with the measured ones, thus showing that the conditions set to stop the filling process were correctly evaluated.
The same experiment was repeated with different gases (O2 and Ar), with different rated volumes, and in different filling facilities. Similar results to those shown in Figure 3 were obtained each time: in particular, the expanded uncertainty was always less than 5 % of the measured value and the results provided by the pressure-based filling method (3) and the gravimetric method were always compatible, with a computed normalized error always less than 1.
6. Conclusions
Based on a study promoted by Assogastecnici (an Italian association representing companies that produce and distribute industrial gases) and developed on the basis of theoretical considerations as well as experimental results, this paper has shown that the measurement method that quantifies the gas filled into cylinders by processing the pressure and temperature values measured at the end of a pressure-based filling process provides results metrologically compatible with those obtained by means of the accurate but far less efficient gravimetric method, thus proving the validity of the method used.
The different uncertainty components affecting the measurement method have been identified, evaluated and combined according to the uncertainty propagation law [7]. Particular attention was paid to the identification and evaluation of the uncertainty components related to temperature measurements, to estimate the gas temperature from the measured cylinder external temperature.
Carefully designed experiments aimed at collecting in-field data from the filling stations employed under normal operating conditions proved that the values obtained by processing pressure and temperature values measured at the end of the filling process are metrologically compatible with those obtained by processing pressure and temperature data collected after the gas reached a state of thermal equilibrium with the environment, thus proving the validity of the assumptions.
The evaluated uncertainty proved that the method is adequate for the intended use of delivering quantities of gas well below the required 10 % tolerance and thus complies with the commercial uses allowed by international laws and regulations. Furthermore, the analysis of the individual uncertainty contributions provides information about where it would be most effective to act in case a reduction of the uncertainty of the final result is necessary.
We conclude that the pressure-based filling method traditionally employed at industrial level to quantify the gas filled into cylinders is metrologically adequate for its intended use and may therefore be employed when the measurement activity falls inside the legal metrology field.
References
[1] Mordor Intelligence, Industrial Gas Market Size & Share Analysis - Growth Trends & Forecasts (2025 - 2030) Source: https://www.mordorintelligence.com/industry-reports/industrial-gas-market.
[2] CGA P-15: Standard for the Filling of Nonflammable Compressed Gas Cylinders, 2022.
[3] EIGA Doc. 30/22, The safe preparation of gas mixtures, 2022.
[4] ISO 10286:2021, Gas cylinders. Vocabulary, 2021.
[5] ISO 11755:2005, Gas cylinders – Cylinder bundles for compressed and liquefied gases (excluding acetylene) – Inspection at time of filling, 2005.
[6] L. Huber, E. W. Lemmon, I. H. Bell, M. Q. McLinden, The NIST REFPROP Database for Highly Accurate Properties of Industrially Important Fluids, Industrial & Engineering Chemistry Research,2022, 61 (42), pp. 15449-15472.
[7] ISO/IEC Guide 98-3:2008, Uncertainty of measurement. Part 3: Guide to the expression of uncertainty in measurement (GUM:1995), 2008.
Footnotes
[a] Assogastecnici is the Italian association of companies that produce and distribute industrial, specialty, and medical gases. Its member companies together represent roughly 95% of the national market.
[b] Strictly, the volume variation should be evaluated at the actual pressure measured at the end of the filling process, instead of the expected one. Due to the small variation between these two values observed in practice, the resulting variation on the volume increment is well within the estimated uncertainty and can, hence, be neglected.
[c] Although not an SI unit, the measurement unit traditionally employed in this field is the bar, which is therefore used in the following.


