OIML BULLETIN - VOLUME LXVI - NUMBER 2 - April 2025
e v o l u t i o n
Static liquid quantity measurement:
More than just a meter
Erik Beumer1 and Frank Bakker2
1. NMi Certin , Netherlands
2. Honeywell Enraf , Netherlands
Citation: E. Beumer and F. Bakker 2025 OIML Bulletin LXVI(2) 20250202
Abstract
Tank measurements have been used for decades to trade liquids, but the Dutch legally introduced term “statische vloeistofhoeveelheidmeter” – or so-called static liquid quantity meter – is still relatively unknown. In this paper we provide information from NMi Certin B.V. about the static liquid quantity meter, intended for owners of tank farms and measuring instruments, manufacturers of measuring instruments, certification bodies and legislators, both in the Netherlands and other countries interested in these developments.
Introduction
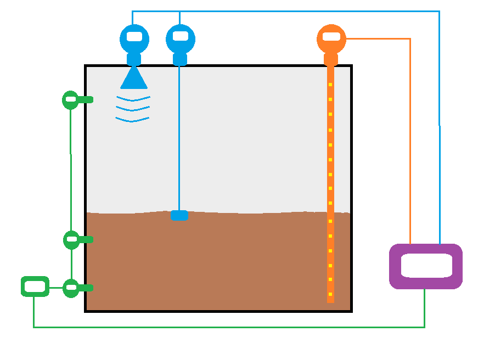
In November 2016, the Dutch law “Regeling nationaal autonoom geregelde meetinstrumenten” came into effect. This Regulation introduced for the first time the term "static liquid quantity meter", being an instrument for measuring the amount of liquid in a measuring reservoir or the amount of liquid displaced in or out of a measuring reservoir. This liquid quantity is measured by means of the combination of a measuring reservoir and one of the following measuring instruments:
- a dipstick divided into units of volume;
- a dipstick divided into units of length;
- an automatic level gauge; or
- a mass meter or so-called hydrostatic tank gauging (HTG) with pressure sensors.

Figure 1. A static liquid quantity meter with radar and servo automatic level gauges (in blue), pressure sensors for a HTG (in green), automatic tank thermometer (in orange) and the calculating and indicating device (in purple).
These static liquid quantity meters are of different types, adapted to:
- relatively small tanks on road tankers;
- medium sized tanks as with rail tankers or ships’ tanks; or
- large fixed land-based tanks with heights up to around 40 metres.
While ships’ tanks are excluded from the Dutch legislation, for all other tanks a static liquid quantity meter must, among other things, meet the requirement set for the maximum permissible error of the measured or converted quantity (see Article 17 of the Regulation), namely:
- at the initial conformity assessment: ±0.8%;
- after commissioning: ±1.0%.
The maximum permissible error for the static liquid quantity meter may not be exceeded under any operating conditions. Considering conditions such as different liquid product densities, and different ambient and liquid temperatures, how can it be proven that the static liquid quantity meter complies with this maximum permissible error of 0.8 % (for initial conformity assessment) and 1.0 % (after commissioning, during use)?
2. Current legislation
In the previous Dutch legislation (“Regeling meetreservoirs, vloeistofhoogtemeters en discontinue brandstofmeters”) the concept of static liquid quantity meter did not yet exist. The measuring reservoir and measuring instrument were still considered and tested separately. Indeed it is common around the world to have this separation.
When testing the measuring reservoir and measuring instrument, manufacturers and certification bodies can use international documents (such as those of OIML, ISO, EN, API, AGA, etc.). However, no international documents are available for testing the static quantity meter as a combined measuring instrument.
Let us consider the available OIML Recommendations:
| Recommendation | Title |
|---|---|
| R 71:2008 | Fixed storage tanks. General requirements |
| R 80:2017 | Road and rail tankers with level gauging |
| R 85:2008 | Automatic level gauges for measuring the level of liquid in stationary storage tanks |
| R 95:1990 | Ships' tanks - General requirements |
| R 125:1998 | Measuring systems for the mass of liquids in tanks |
OIML Recommendations R 71 and R 95 are specific to storage tanks and do not include further details about the measuring devices involved. OIML Recommendation R 85 is specific to automatic level gauges as measuring device and is focused on proving the accuracy in length, and not other quantities, such as volume or mass, of relevance to the static liquid quantity meter.
OIML R 125 is specific to mass measuring systems relying on hydrostatic tank gauging (HTG). In this Recommendation the maximum permissible error in the mass determination is specified to be ± 0.5 %, but not all details are specified for the execution of a type approval investigation, such as the maximum permissible error for the pressor transducers. Within OIML R 125 a reference is given to ISO 11223, where this information can be found but this need only be taken into account if the accuracy of the mass determination of ± 0.5 % can be achieved by measurement uncertainty calculations. Despite the lack of some detailed information in the OIML R 125 and ISO 11223, this Recommendation can be used for static liquid quantity meters based on HTG.
OIML R 80 includes the combination of a measuring reservoir and measuring instrument as road and rail tanker with level gauging as measuring device. Herewith testing is described for the complete measuring system, but also parts of the system such as volume conversion, temperature measuring devices, inclination sensor, floats (general), dipstick pipes for ultrasonic systems, calculator and indicating device. However this Recommendation is specific to static volume measurements for road and rail tankers which often have smaller tanks than fixed large land-based tanks. So it is possible to test this as a complete measuring system with a reference volume prover or reference meter. Also measurement characteristics are defined such as minimum level difference corresponding to MMQ, which are noted in the OIML R 80 to be based on an expanded uncertainty. Within OIML R 80 conditions are specified to achieve the required accuracy, such as a maximum permissible error for the temperature sensor, and requirements for the tank material due to temperature differences. So OIML R 80 can be used for static liquid quantity meters for road and rail tankers with level gauging, but as the Dutch legislation state a maximum permissible error of 0.8 % (for initial conformity assessment) and 1.0 % (after commissioning), the following measuring systems cannot use the OIML R 80 as the accuracy requirement is higher for these measuring systems:
- liquefied gases under pressure measured at a temperature equal to or above –10 °C;
- liquefied carbon dioxide;
- liquefied gases under pressure measured at a temperature below –10 °C;
- cryogenic liquids.
Similarly, large fixed land-based tanks fall outside the scope of OIML R 80. With large tanks it is also more difficult to prove the accuracy by testing.
The question is therefore: How can the testing of a ‘static liquid quantity meter’ be carried out to check that the requirements set out in the “Regeling nationaal autonoom geregelde meetinstrumenten” (hereinafter Regulation) are met?
It is practically impossible to test all possible operating conditions in the field. To begin with, the size of the static liquid quantity meter with the measuring device and the tank is quite large. Some tanks are 40 metres high. Environmental tests cannot be performed with the static liquid quantity meter here, as is normally done in a climate chamber. Temperature tests with liquid are also time-consuming and expensive due to the heating or cooling of large quantities of liquid. In addition, a stratified temperature distribution is then created in large tanks. Transferring liquids to other tanks is often not possible due to insufficient tank capacity or the risk of contamination of the liquid. Another method must therefore be used to be able to test the static liquid quantity meter against the maximum permissible error.
Finally, a temperature measurement is used to determine a converted quantity, for example the volume at 15 °C. The Regulation does not set any requirements for a separate temperature sensor. The maximum permissible error for the temperature sensor is not specified here, but again the maximum permissible error for the total static liquid quantity meter may not be exceeded (see Article 17 of the Regulation). Some guidance can be found in OIML R 80 and other standards such as API chapter 7.3 for fixed automatic tank temperature systems where a specific maximum permissible error for temperature measurements is defined, but the effect on the accuracy of the complete measuring system remains unknown.
3. Method
Since it is not possible to test a static liquid quantity meter against the maximum permissible error by means of testing, the only way to do this is by determining the measurement uncertainty of the static liquid quantity meter. When determining the measurement uncertainty, all sources of uncertainty of the static liquid quantity meter must be mapped. The contributions of individual sources of uncertainty are determined by means of separate measurements, converted data and calculations based on assumptions.
The relationship of these sources of uncertainty to the measured or converted quantity of the static liquid quantity meter is set up in a calculation model. This calculation model can be used to determine the measurement uncertainty of the static liquid quantity meter for all possible operating conditions. This method for determining the measurement uncertainty is described in international standards, such as OIML G1-100-en:2008 ‘Guide to the expression of uncertainty in measurement’ (abbreviated GUM) or the EA-4/02 ‘Evaluation of the Uncertainty of Measurement in Calibration’.
The following uncertainty sources must be taken into account where applicable:
- Tank measuring reservoir
- Tank bottom calibration
- Tank shell calibration
- Hydrostatic shell deformation
- Density liquid → Calibration liquid different compared to actual liquid
- Pressure vapour space → Overpressure
- Tank shell elasticity coefficient → Determination of this coefficient
- Tank shell design (rims)
- Thermal expansion shell
- Tank shell temperature (wet and dry)
- Sunlight heating
- Tank isolation factor
- Ambient temperature
- Wind speed → Influences the tank shell temperature
- Tanks shell temperature expansion factor → Determination of this factor
- Bottom settling effects
- Floating roof
- Tank floating roof calibration
- Effects on weight
- Ladder weight
- Water (e.g. rain)
- Snow
- Wind speed
- Friction
- Angle
- Gauge reference height (GRH) [1]
- GRH calibration
- Temperature expansion
- GRH expansion factor
- GRH temperature (wet, dry and ambient)
- Insulation factor tank shell → With automatic level gauge (ALG) fixed to roof
- Shell temperature due to sunlight → With ALG fixed to roof
- Hydrostatic shell deformation → With ALG fixed to roof
- Fixed roof deformation → With ALG fixed to roof
- Measuring device – Automatic level gauge
- Accuracy ALG
- Calibration uncertainty
- Measurement error
- Reading / resolution
- Mounting angle
- Magnetic strength (temperature) → For servo level gauges
- Wire weight → For servo level gauges
- Immersion dept → For servo level gauges
- Vapour composition → For radar level gauges
- Vapour pressure
- Vapour temperature
- Accuracy ALG
- Measuring device – HTG
- Accuracy pressure sensor
- Calibration uncertainty
- Measurement error
- Reading / resolution
- Mounting height sensor
- Mounting angle sensor
- Temperature expansion mounting point
- Hydrostatic deformation effect on angle
- Air density → Applicable for differential pressure sensors
- Vapour density
- Accuracy pressure sensor
- Vapour content [2]
- Vapour space volume calculation
- Vapour room pressure → Compressibility
- EVP (equilibrium vapour pressure)
- Liquid composition
- Vapour room locked gases (Nitrogen)
- Vapour space calculation
- Accuracy
- Temperature expansion shell
- Hydrostatic shell deformation
- Standard volume conversions
- Product temperature
- Measurement by automatic tank thermometer (ATT) or manual method
- Temperature stratification
- Product pressure
- Product type
- Observed density
- Density stratification
- Product temperature
- Mass and/or weight
- Density of liquid
- Weight is corrected for the buoyancy effect
- Density of air
- Temperature
- Humidity
- Pressure
- Density of liquid
- Density of air
This list is not exhaustive and other sources of uncertainty may also need to be considered.
4. Operating ranges
On the basis of the results of the uncertainty calculation of the static liquid quantity meter and the specific components used, the operating range can be determined. This information of the operating ranges will be stated on the markings of the measuring instrument and in the certificate belonging to the verification. Important information on the marking and this certificate are the measuring range (minimum, maximum and difference), the density and the temperature of the liquid for which the certificate applies.
The certificate of the static liquid quantity meter can be based on existing certificates of measuring devices such as a liquid automatic level gauge or mass meter (HTG).
Each individual static liquid quantity meter is required to have its unique certificate. There is no validity period on the certificate, but if a change occurs after the certificate has been issued, the certification body must be contacted.
In other words, the certification of the static liquid quantity meter ensures that there is clarity about which measuring range and conditions the static liquid quantity meter can be used within the legal frameworks of metrology.
5. Example
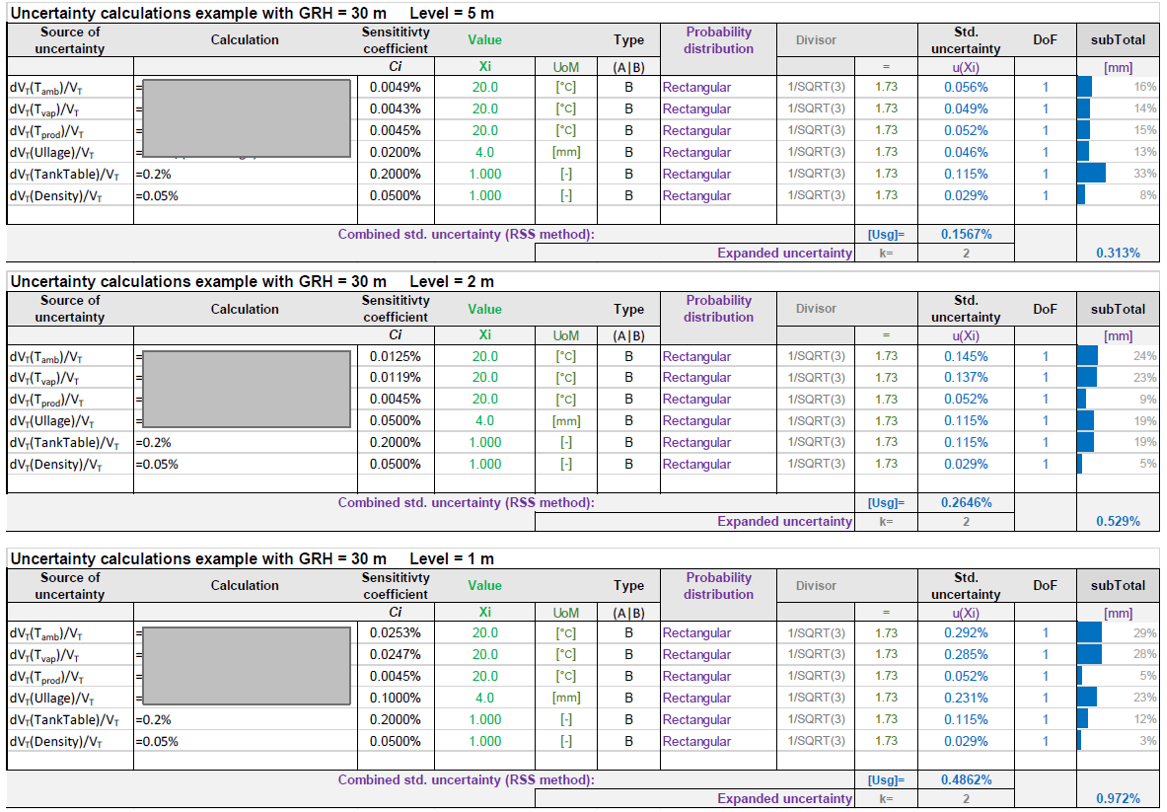
As example, we assume a static liquid quantity meter with measuring reservoir (tank), automatic level gauge (ALG) and with a gauge reference height (GRH) of 30 m. Both tank and ALG are calibrated to (inter)national standards according to the applicable OIML R 71 and R 85. The calibration tank table is given at reference conditions for liquid temperature and density. Also the reference height is given at reference temperature.
Now in this example, the initial situation is that there is no temperature sensor such as an automatic tank thermometer (ATT). Based on all the relevant information for the measurements, the following simplified uncertainty calculations of the measured volume are made by Honeywell Enraf (for confidential information the partial derivatives are hidden) for different levels:

In these tables, the symbols are defined as follows:

As seen from the uncertainty calculation, the expanded uncertainty becomes higher as the level becomes lower. With such calculation an optimum can be found what the minimum measured quantity for inventory can be in compliance with the maximum permissible error of ±0.8% (or ±1.0%).
In the uncertainty calculation examples above the temperature is not measured. But when product and vapour temperature is measured, for example with an ATT, the uncertainty for Tvap and Tprod can be lowered which results in a lower expanded uncertainty as shown in the following example:

It should be noted that these are only examples and that the above uncertainty calculation is simplified and not all uncertainty sources are included. So other aspects of the static liquid quantity meter need to be taken into account to determine the operating ranges.
6. Harmonization
At the time of writing there are no international documents available for testing and certification of a static quantity meter as a combined measuring instrument. Within the Dutch Regulation only the requirements are laid down, but there is no guidance on how they can be achieved, in particular concerning what should be taken into account when making an uncertainty calculation and which uncertainty sources can be excluded.
NMi Certin is actively involved with this subject and has organized serveral events to bring Dutch parties up to date on the latest developments and provide insights on this new type of measuring instrument. At such a meeting at NMi Certin on 21 January 2025, the need for harmonization was agreed amongst all participants, including designated bodies, manufacturers and some terminals. It is intended to harmonize the above into a standard so that within the Netherlands all parties involved can handle certification and verification of static liquid quantity meters in a harmonized manner.
Notes
[1] With a fixed roof the bulking effect can be significant. Usage stilling well has a major impact on the measurement uncertainty
[2] This has a big impact during a transfer, as the volume of vapour space changes.


